If you use Odoo for your business, you already know it is a powerhouse. But there is one specific tool inside the Accounting module that acts like a "silent assistant." It is called Fiscal Positions.
Now, "Fiscal Position" sounds like a scary accounting term, but it is actually very simple. In plain English, a Fiscal Position is just a "Tax Rule." It tells Odoo: "When I sell to this person in this place, use this tax instead of my normal one."
Wrong Tax
Imagine you run a shop in New York. Most of your customers walk in off the street, and you charge them the local sales tax. That is your "Default Tax."
But then, your website takes off. Suddenly, you are shipping a box to London. Then another to California. Then another to a non-profit organization that doesn't have to pay taxes at all.
If you don't have Fiscal Positions set up, your poor salesperson has to remember the tax laws for every single location. They have to click into the invoice, delete the 8% tax, find the 0% "Export" tax, and hope they didn't make a mistake. This is exactly how businesses get into trouble during a tax audit. It is slow, it is boring, and it is risky.
The Solution: How Fiscal Positions Work
Think of a Fiscal Position as an "If/Then" machine.
-
IF the customer is in my home state, THEN use the normal 8% tax.
-
IF the customer is in another country, THEN switch the tax to 0%.
-
IF the customer is a school or a charity, THEN remove the tax completely.
In Odoo 19, you don't have to think about this after the first setup. Once you build the rule, Odoo watches the "Delivery Address" on your invoice. The moment you type in "United Kingdom," Odoo's brain recognizes the rule and flips the tax for you. It happens in less than a second.
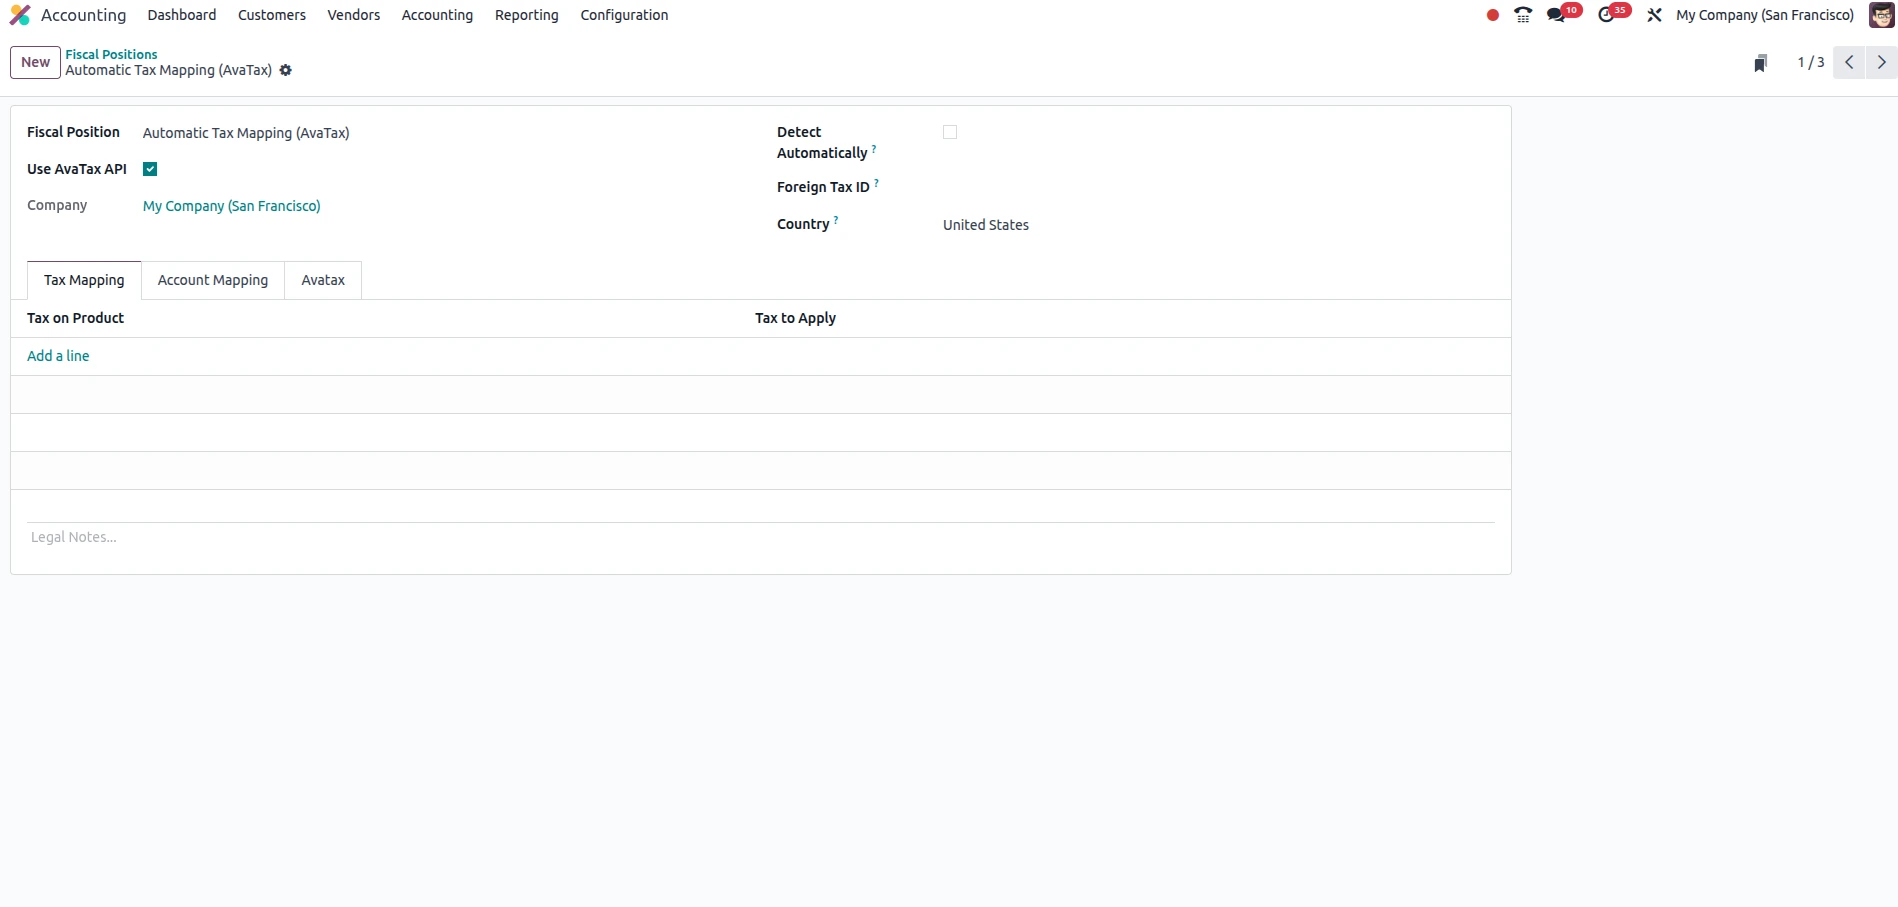
The Two Main Parts of a Fiscal Position
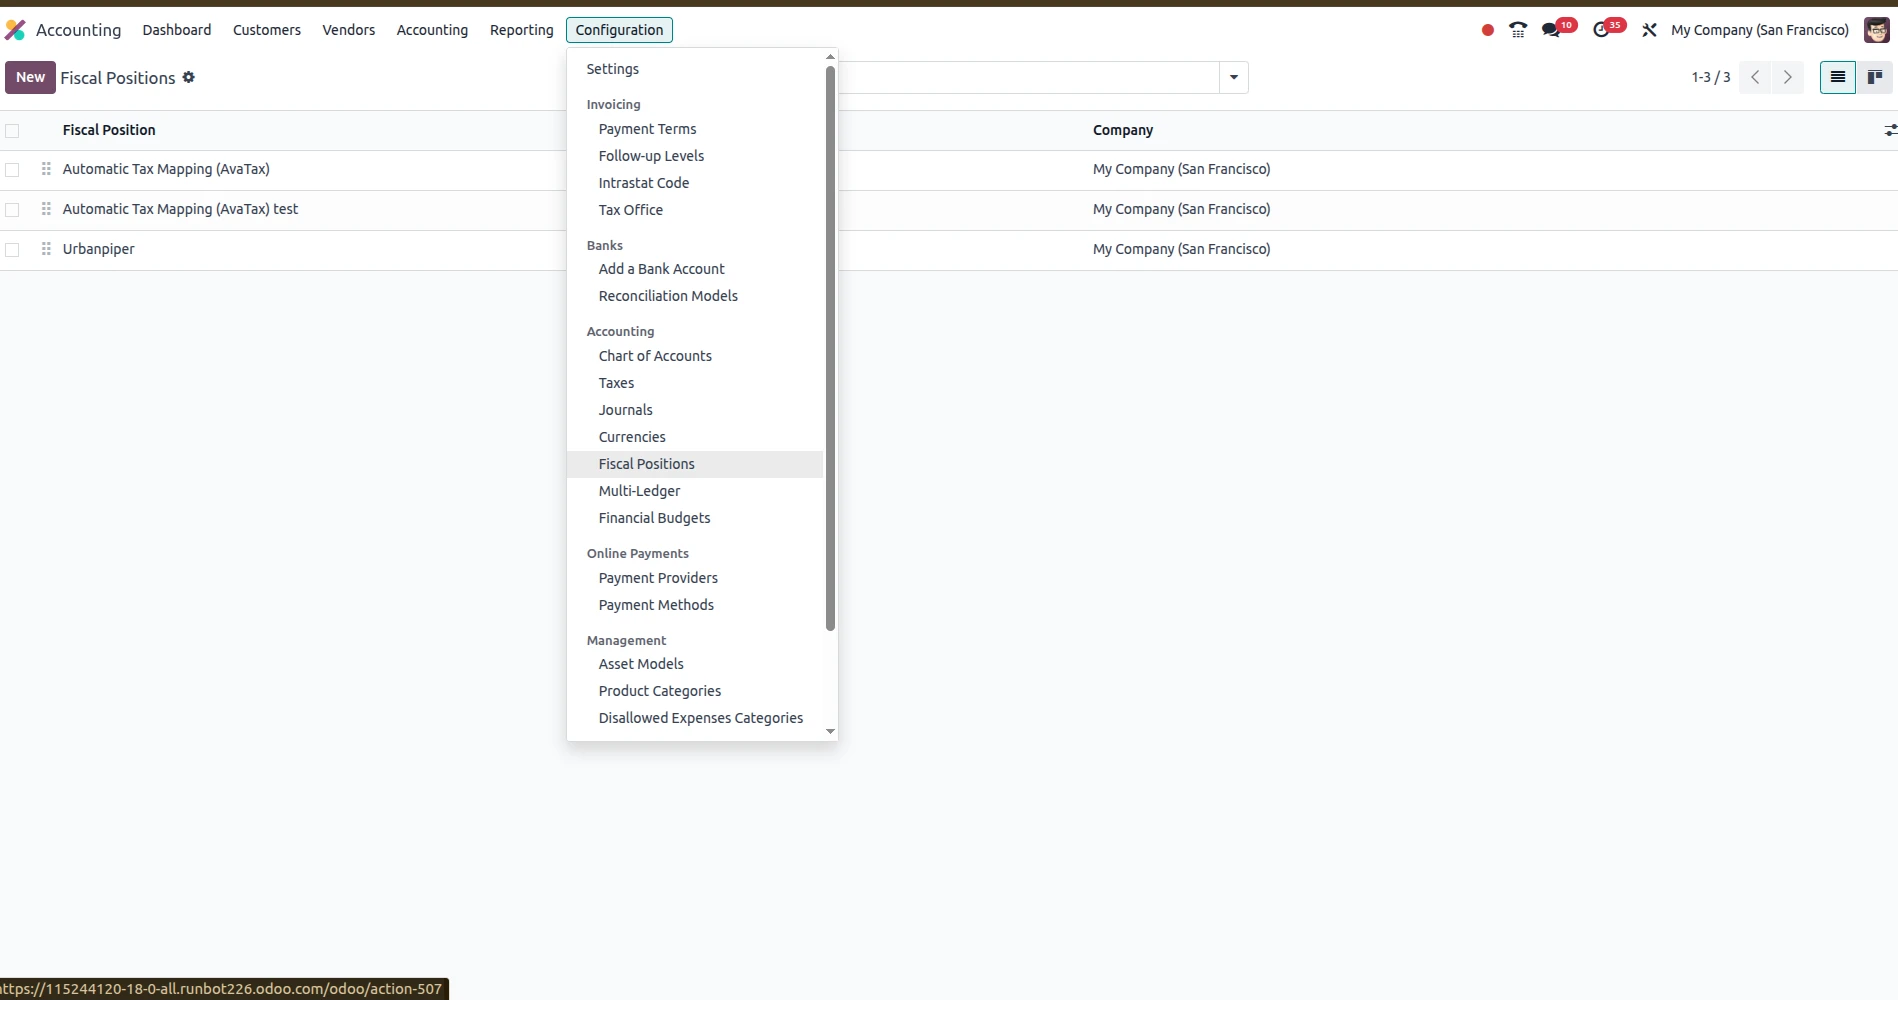
When you go to Accounting → Configuration → Fiscal Positions, you will see two main boxes you can play with.
1. Tax Mapping (The "Tax Switch")
This is the part most people use. Every product in your Odoo system has a "Default Tax." Let's say you sell a chair for $100 with a 10% tax.
Inside the Fiscal Position, you create a map. You tell Odoo: "Look for the 10% tax. If this rule is active, replace it with 0%." The beauty here is that you don't need two different products (one for locals and one for foreigners). You keep one product, and the Fiscal Position changes the "price tag" based on who is buying it.
2. Account Mapping (The "Money Organizer")
This part is for the business owners who love clean reports. When you sell something locally, the money usually goes into an account called "Product Sales."
But what if you want to know exactly how much money you made from overseas exports versus local sales?
Account Mapping lets you tell Odoo: "When I sell to a foreign customer, don't put the money in 'Product Sales.' Put it in a different bucket called 'Export Income'." At the end of the year, your Profit & Loss report is already organized. You don't have to spend hours with a calculator trying to separate your international wins from your local ones.
Making it Fully Automatic
The best part of Odoo 19 is that it can work on Autopilot.
Inside the Fiscal Position settings, there is a small checkbox called "Detect Automatically." When you check this, a new set of options appears. You can tell Odoo to trigger this specific tax rule based on:
-
Country: If the country is "Canada," use the Canadian rule.
-
Zip Codes: This is a lifesaver for businesses in the US or countries with complex local taxes. You can set a range of zip codes for a specific city.
-
VAT ID: In Europe, if a business has a "VAT Number," they often don't have to pay tax on B2B purchases. Odoo can check if that number is filled out on the customer's profile and apply the tax-free rule automatically.
What Makes Odoo 19 Different?
Odoo 19 has made the user interface much cleaner. It uses a "Sequence" system. Think of this like a list of priorities.
If you have a general rule for "Europe" and a very specific rule for "Italy," you want Odoo to check the Italy rule first. By giving the Italy rule a higher sequence number, Odoo knows to check the specific details before moving to the general ones. It is like a filter that gets more specific as the money moves through the system.
Three Tips for Success
If you are setting this up today, keep these three things in mind:
-
Check your Localization: When you first set up Odoo, it asks you what country you are in. If you pick the right country, Odoo will actually build the most common Fiscal Positions for you! Don't build them from scratch until you check what Odoo has already given you.
-
The "Contact" Shortcut: Sometimes you have a customer who is special. Maybe they are a government agency that never pays tax, no matter where they are. You can go to that Contact's profile, click the Sales & Purchase tab, and manually pick a Fiscal Position for them. Now, every time you sell to them, Odoo will use that rule regardless of the address.
-
The "Draft" Test: Before you start sending out real invoices, make a "Test Customer" from a different country. Create a "Draft Invoice" and see if the taxes change. It is a great way to make sure your rules are working before the "tax man" comes looking!


.jpg )


Leave a comment